KiCad BOM Wizard
This is a KiCad plugin can be used to export custom BOM using configurable templates files. Built-in Examples include CSV, HTML & PDF.
This is a KiCad plugin can be used to export custom BOM using configurable templates files. Built-in Examples include CSV, HTML & PDF. KiCad_BOM_Wizard is writing in JavaScript and has been designed to integrate into KiCad’s BOM plugin manager.
The idea for KiCad_BOM_Wizard came from our need to generating BOM that are specific to our clients. for example, some of our clients require that their product have document traceability. With KiCad_BOM_Wizard, We simply made a template that the output file includes the document number, revision, and manufacture notes.

By default, KiCad_BOM_Wizard comes with two templates, one will generate a stand along HTML file and the other will generate a CSV file. They are both include to simplify the use of plugin and can be used as an example by those who want to make their own templates. The latter could be due to needing to have your own company or project logo.
Just in case you don’t know, KiCad’s plugin manager works by first generating an XML file that holds all of the project information include the list of parts you are using. After it generates this file, it will run a user define program with the XML file as an input parameter with any other user define parameters.
KiCad_BOM_Wizard works by scanning through all of the template files ( here’s the list ) and replacing any of the Short Codes with the data that is associated with it. It will then output all of the data into one file based on the order that it finds the short codes.
For example, if KiCad_BOM_Wizard finds the short code <!--TAG_TITLE--> in template.conf then it we replace it with the project title as set in the KiCad root document.
The plugin will group and sort all components together that have same parts value, the same starting designator reference prefix and the same fields value.
For example, if your project component list consist of;
then it would be grouped like this;
| Ref | Qty | Value |
|---|---|---|
| C1 | 1 | 10pF |
| R1 R3 | 2 | 10K |
| R2 | 1 | 100K |

First you will need Node.js install and configure in you system. if you are using ubuntu then you can installing it by running the following commands.
If you are using windows or a mac you can follow this link to download node.js installer.
https://nodejs.org/en/download/
there have been reports that `node` wont run in KiCad BOM generator unless its full path has been specified.
If you have this issues, try replacing `node` with `PATH_TO_NODE/node` where PATH_TO_NODE is your system absolute path to node.
Here’s where it was first repoted: kiCad.info
The prefer method is to install KiCad_BOM_Wizard vai the NPM package manager. You just need to run the following command.
If you are using git, then you can run the flowing command to clone the project.
then run the install command inside the KiCad_BOM_Wizard directory
You will need to open an existing project schematic using KiCad Eeschema. For this example I am going to use KiCad complex_hearachy project example and setup KiCad_BOM_Wizard to generate the HTML and CSV BOM. I am also going to assume that you have the install node.js and proven that it works. And finally, I also going to assume that you have a copy of the KiCad_BOM_Wizard in your computer root directory.

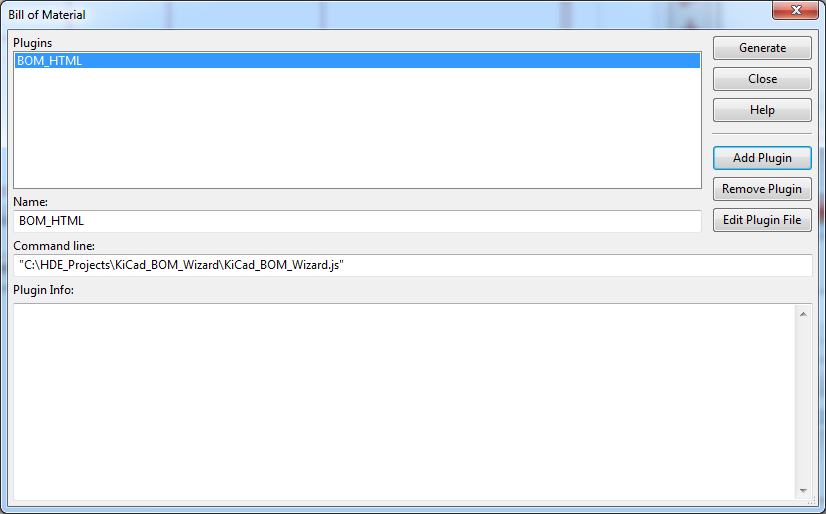
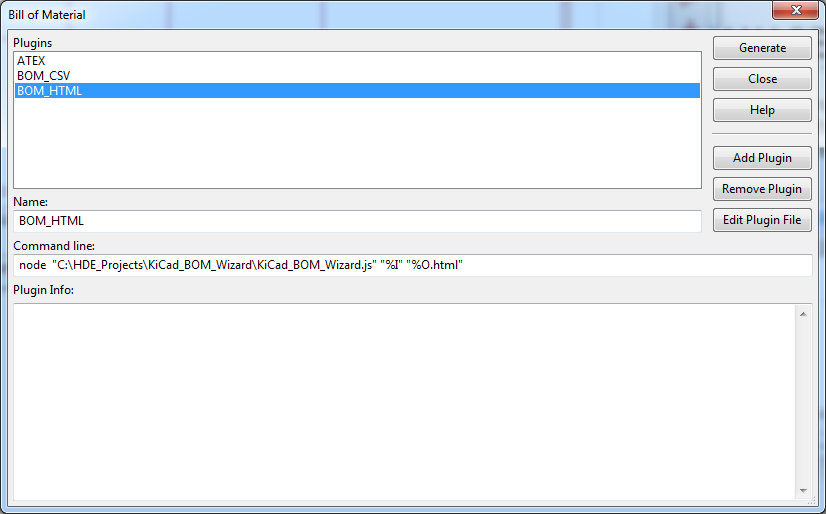
In Eeschema, Click the BOM icon. this should bring up the following window.
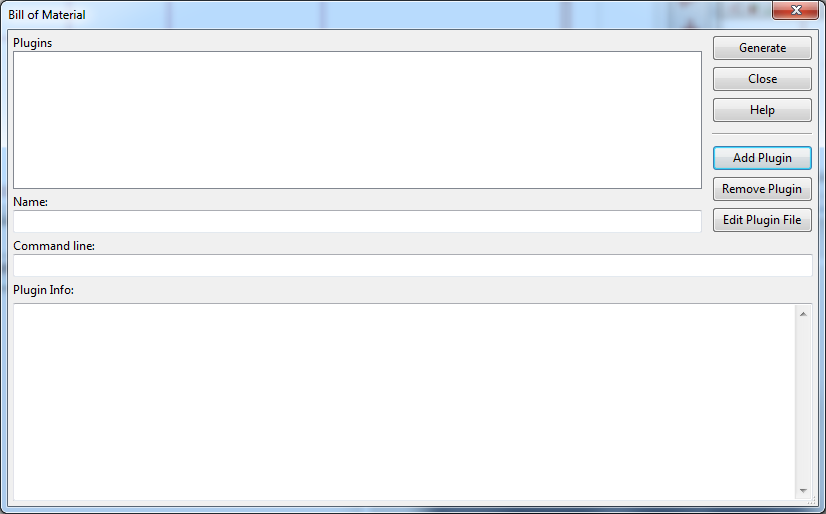
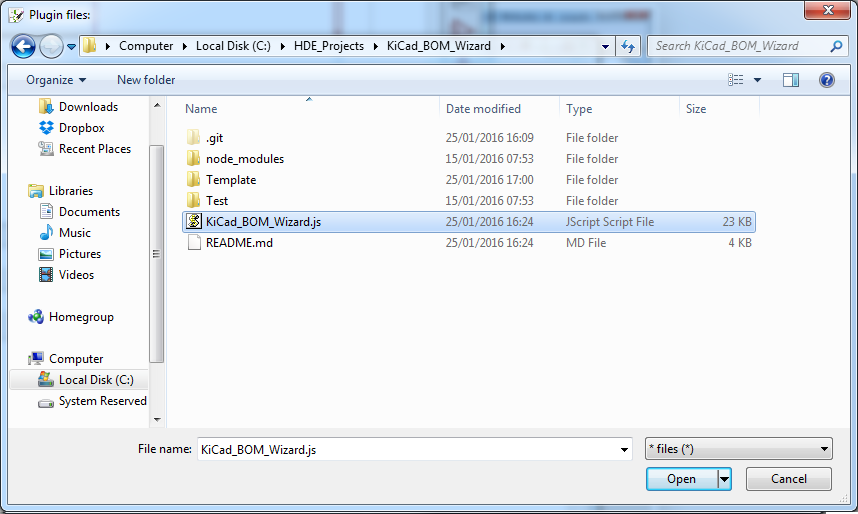
Now click on the “Add Plugin” button. On the file explorer file, find and open “KiCad_BOM_Wizard.js”.
When prompt for the Plugin name, type in BOM_HTML and click OK.

So far the new plugin profile should look like this. Its not ready, we still need to add the extra parameters to make it work.
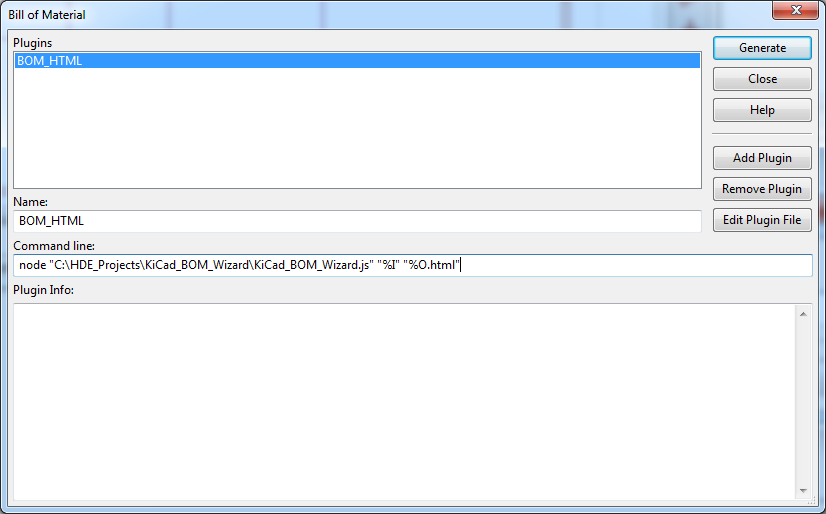
Under Command line: change it to the following.
SCRIPT_ROOT_DIR is the directory path to where your KiCad_BOM_Wizard.js is located, “%I” is replace by kicad with the xml file it generate and “%O” is also replaced by KiCad with the output directory and name.
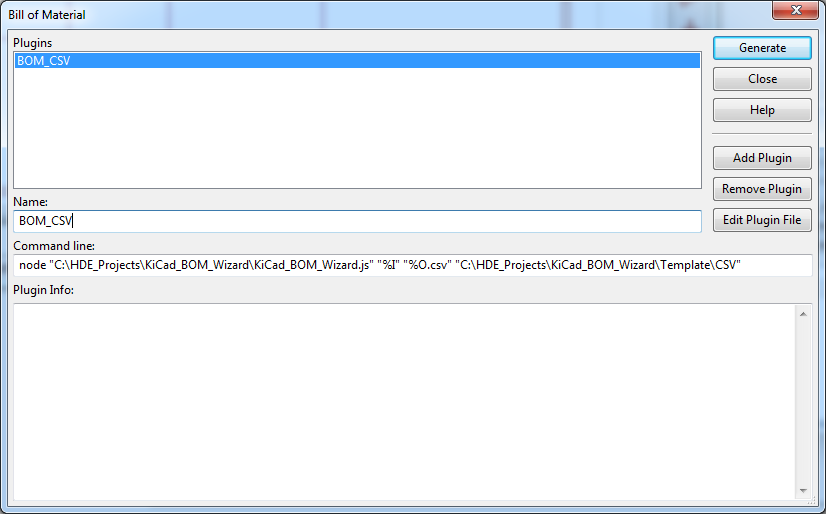
To add the CSV profile repeat the HTML instructions but when prompt for the plugin name type BOM_CSV and change the Command Line: to the following.
SCRIPT_ROOT_DIR is the directory path to where your KiCad_BOM_Wizard.js is located, “%I” is replace by kicad with the xml file it generate and “%O” is also replaced by KiCad with the output directory and name.
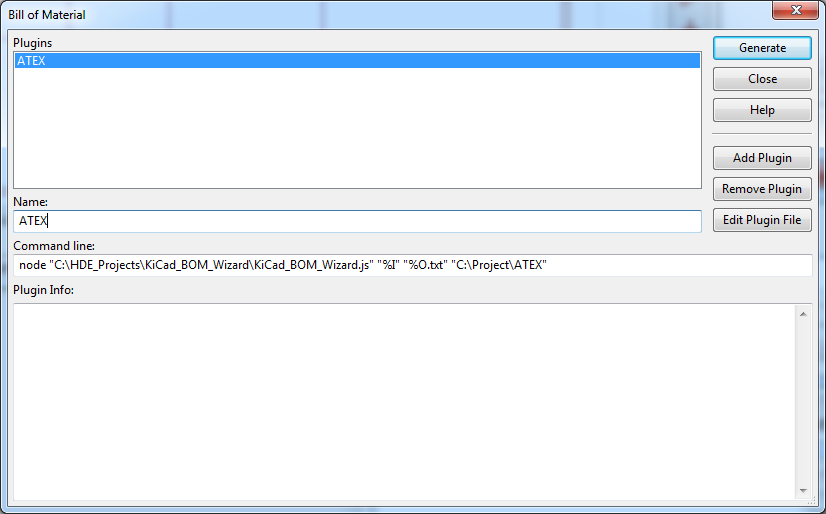
To add the CSV profile repeat the HTML instructions but when prompt for the plugin name type in your own name and change the Command Line: to the following.
SCRIPT_ROOT_DIR is the directory path to where your KiCad_BOM_Wizard.js is located, YOUR_TEMPLATE is the directory path to your own template folder, MY_FILE_EXT is the file extension you want your output file to use, “%I” is replace by kicad with the xml file it generate and “%O” is also replaced by KiCad with the output directory and name.
We are assuming that you have already added the BOM_HTML profiles to KiCad plugin manager. We are also assuming that you have set the project sheet, date, company, revising and Comment 1 to 4.
Click the BOM icon in Eeschema. this should bring up the following window with the profile you have added.
Now select the BOM_HTML profile and click on the Generate button. When KiCad is done, it should show a Success message under the Plugin Info:.
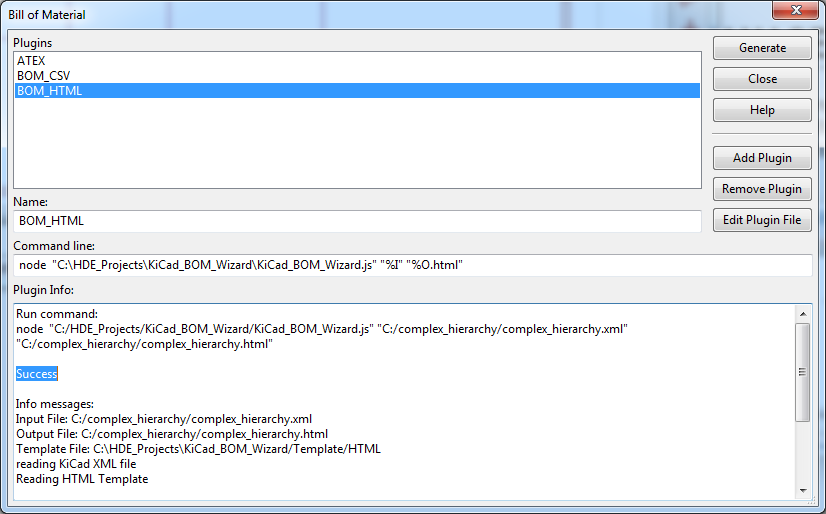
If you go back to the KiCad Project Manager, you should now see the new HTML file that has been added to your project.

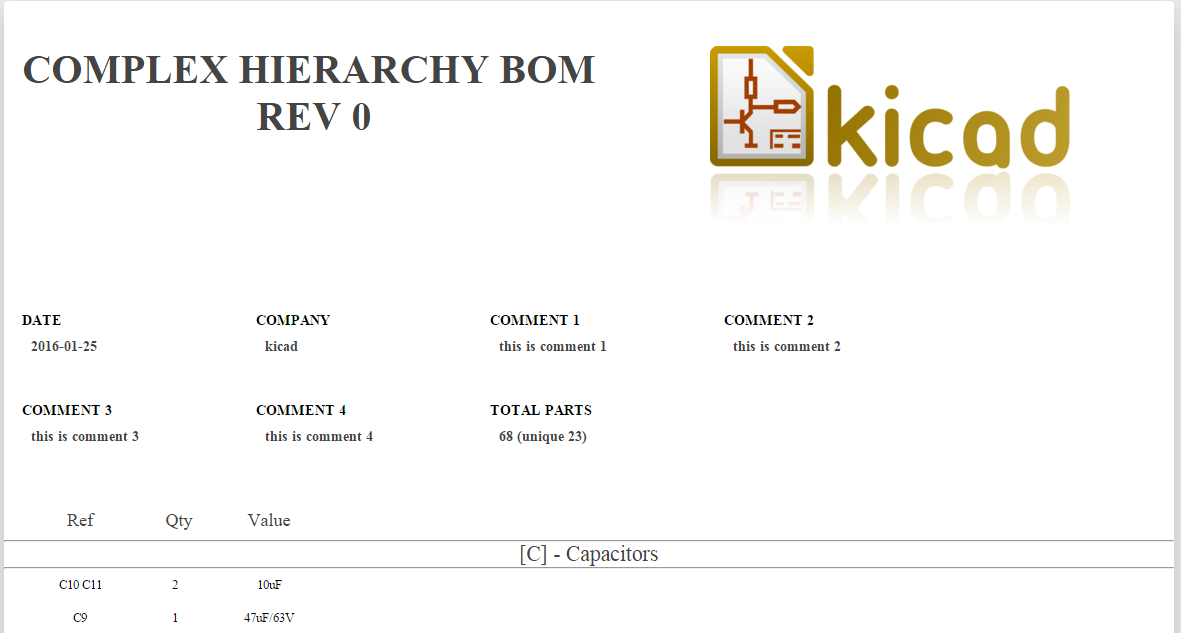
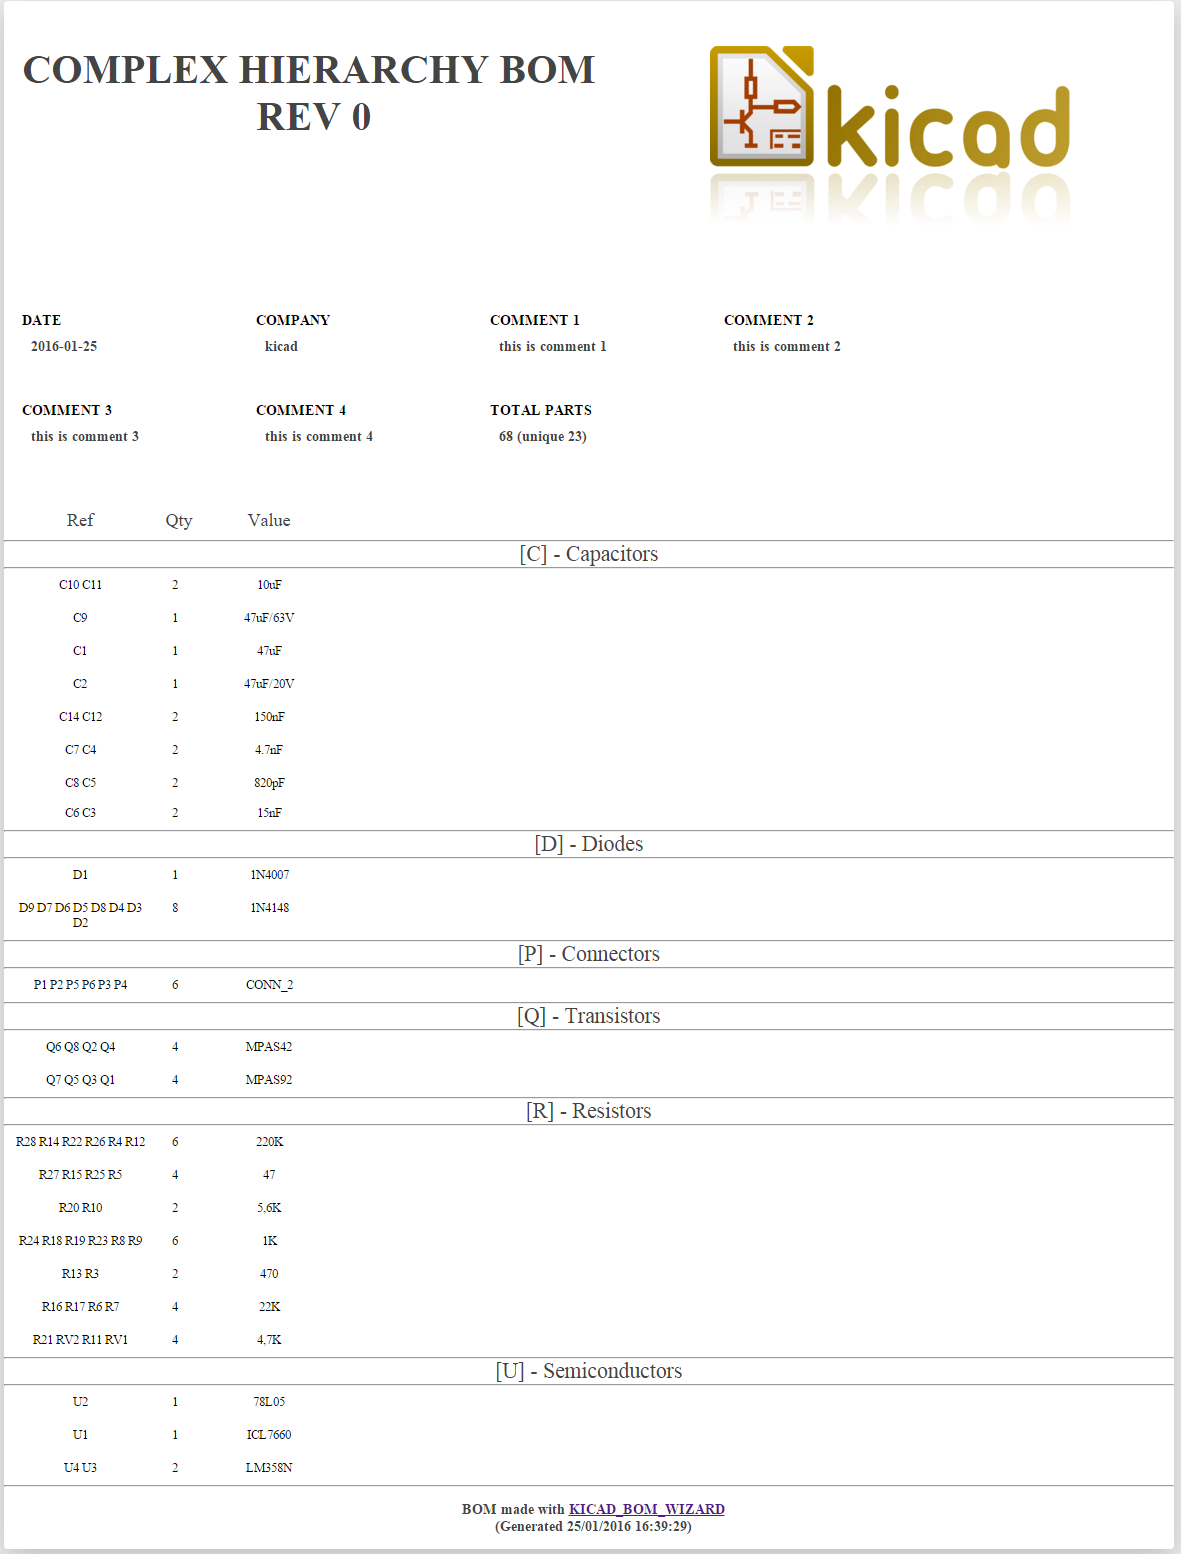
If you open the new html file you should get something like this.
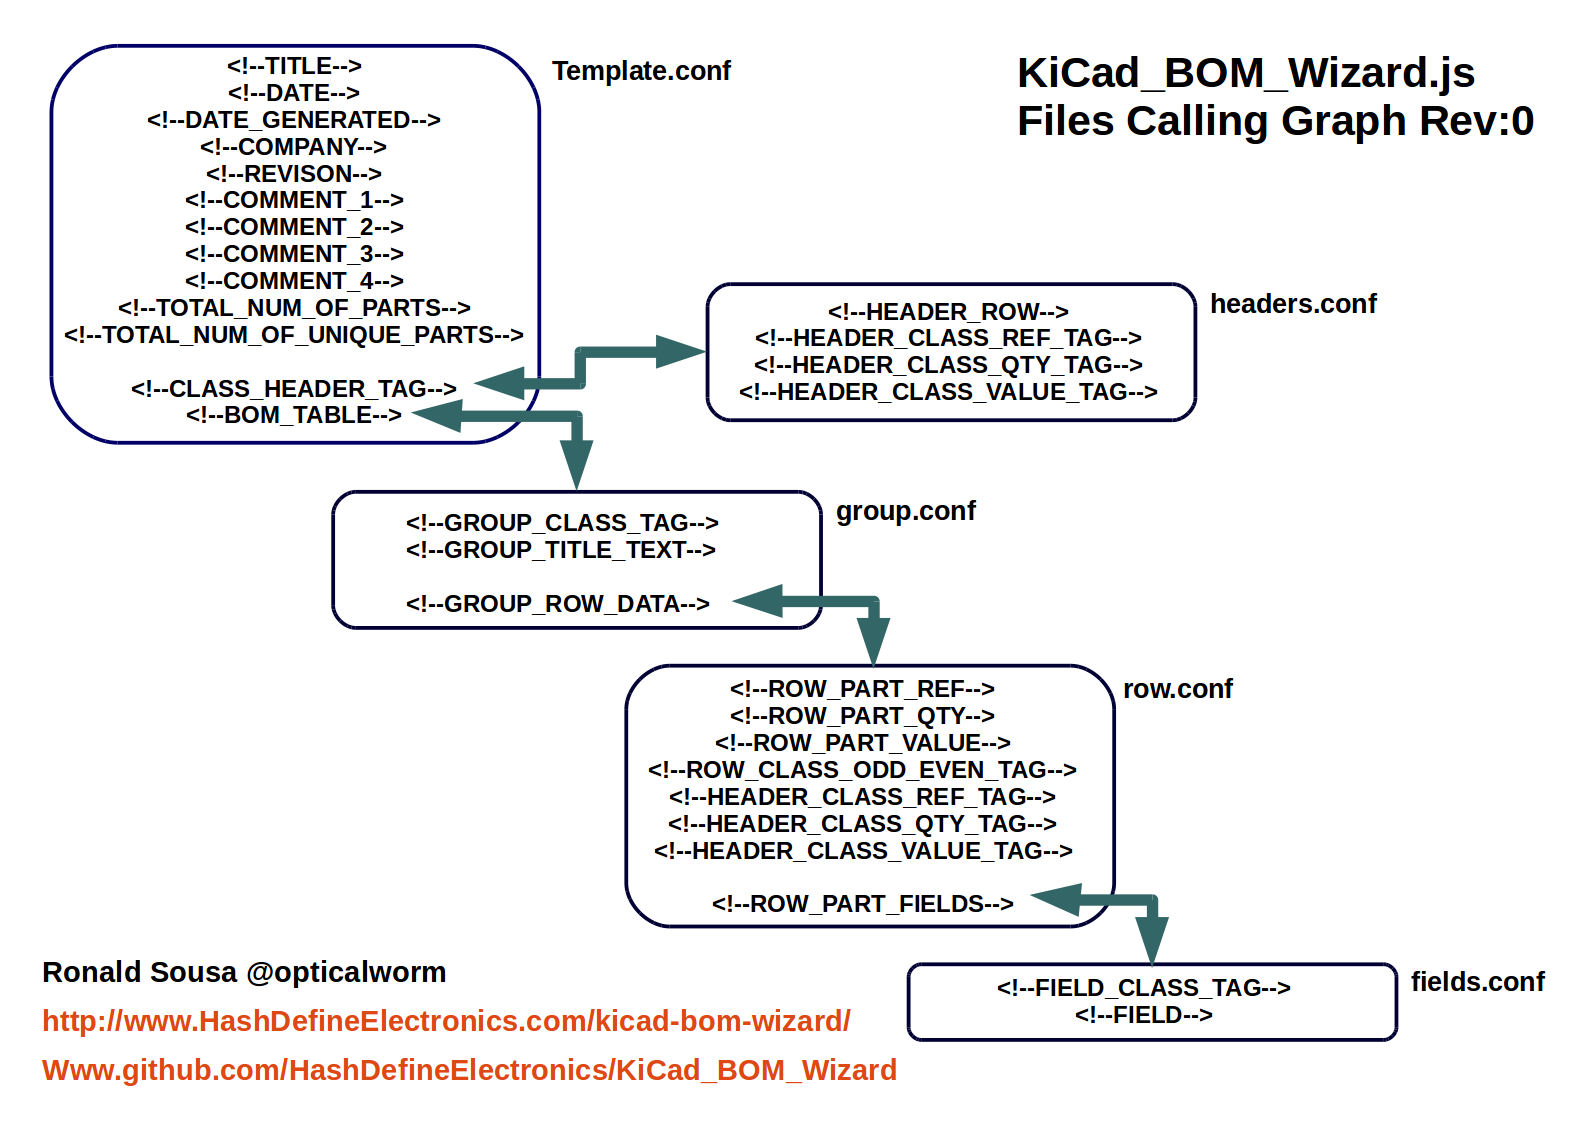
KiCad_BOM_Wizard.js requires a specific set of files that allow it to successfully generate your BOM file. In this section, I will explain what files you need, how KiCad_BOM_Wizard uses them and which short code you can use in them.
The best way to start making your own template is by copying an existing one. The HTML and CSV templates that that come with KiCad_BOM_Wizard should be a good starting point. The following section should help in clarifying what each of the files and short codes do.
Here is a list of all the files that a template needs. If you are planning on using the file, simple leave its content blank.
| File name | Description |
|---|---|
| template.conf | Main root |
| headers.conf | The header configuration file is used to create the table headers. It should describe how a single header column should look like. |
| group.conf | The group configuration file is used by KiCad_BOM_Wizard to generate a group of parts table data. |
| row.conf | The row configuration file describes the row first four columns order and style. The columns are components designator, quantity, part value and fields. This is used by the group.conf. |
| fields.conf | fields configuration file is used by KiCad_BOM_Wizard to generate the fields columns. If you want to generate a BOM without fields then you can simple leave this file blank. |
This are the lists of short codes that each of the files support.
| Code | Description |
|---|---|
| <!--TITLE--> | inserts the root sheet title. |
| <!--DATE--> | inserts the root sheet date. |
| <!--DATE_GENERATED--> | inserts the date and time the Kicad net file was created |
| <!--COMPANY--> | inserts the root sheet company name |
| <!--REVISON--> | inserts the root sheet revision value |
| <!--COMMENT_1--> | inserts the root sheet comment 1 |
| <!--COMMENT_2--> | inserts the root sheet comment 2 |
| <!--COMMENT_3--> | inserts the root sheet comment 3 |
| <!--COMMENT_4--> | inserts the root sheet comment 4 |
| <!--TOTAL_NUM_OF_PARTS--> | inserts the number of parts used in the design |
| <!--TOTAL_NUM_OF_UNIQUE_PARTS--> | inserts the number of unique parts used in the design. Note, if two similar parts have different fields then it will be register as unique |
| <!--CLASS_HEADER_TAG--> | inserts the table headers |
| <!--BOM_TABLE--> | inserts the complete generated BOM table |
| Code | Description |
|---|---|
| <!--HEADER_ROW--> | inserts the column title |
| <!--HEADER_CLASS_REF_TAG--> | insert the tag for the part reference. HeadRefTag |
| <!--HEADER_CLASS_QTY_TAG--> | insert the tag for the part qty. HeadQtyTag |
| <!--HEADER_CLASS_VALUE_TAG--> | insert the tag for the part value. HeadValueTag |
| Code | Description |
|---|---|
| <!--GROUP_ROW_DATA--> | inserts the group of parts row data |
| <!--GROUP_CLASS_TAG--> | inserts the group class name. format "group_" + "part ref prefix" |
| <!--GROUP_TITLE_TEXT--> | inserts the group title. the part ref prefix |
| Code | Description |
|---|---|
| <!--ROW_PART_REF--> | inserts the list of parts reference designator |
| <!--ROW_PART_QTY--> | inserts the number of parts grouped together |
| <!--ROW_PART_VALUE--> | inserts the part value |
| <!--ROW_PART_FIELDS--> | inserts the generator parts fields |
| <!--ROW_CLASS_ODD_EVEN_TAG--> | returns RowEvenTag on even rows or RowOddTag for odds rows. |
| <!--HEADER_CLASS_REF_TAG--> | insert the tag for the part reference. HeadRefTag |
| <!--HEADER_CLASS_QTY_TAG--> | insert the tag for the part qty. HeadQtyTag |
| <!--HEADER_CLASS_VALUE_TAG--> | insert the tag for the part value. HeadValueTag |
| Code | Description |
|---|---|
| <!--FIELD_CLASS_TAG--> | inserts the fields class name |
| <!--FIELD--> | inserts the field value |
Comments or questions are welcome.
Comment(39). Leave comment
Hi Dear friend,
Could I send my xml file as a bug example in e-mail? It is about the GROUP function when the user field is added.
best regards,
Samuel Lee
I could do it via email, but I was hoping to keep bug reports and feature requests open to the public.
Would you be comfortable with openly sharing your project XML? if so could you post as a shared link via google drive or Dropbox link in here? Or better yet in the KiCad Forum?
Hi, thanks for your great work about the KICAD_BOM_WIZARD!
I want to report 2 bugs about the wizard.
BUG1, in HMS_1.htm, the values of C49 and C51 are “0.1u” and footprints “C0805”, but they are grouped with all the capacitors “0.1u”/”C0603”;
BUG2, when I fill the field “ORC” of C49 and C51 as “C0805xxx” expecting they could be seperated from “0.1u”/”C0603” group, the “0.1u”/”C0603” group suddenly EXPLODES! see MHS_2.htm 🙂
Please refer to the following URL
http://pan.baidu.com/s/1i5yatLV
Thank you for the test samples it has helped to find what was causing the grouping of the component to fail. It turn out to be a flag that wasn’t reset every time a component is tested for grouping. Also, it wasn’t checking if the grouped components have the same footprint.
I’ve update the plugin with the fix. I’ve pushed the update to the Github repository and the npm registry.
On a similar note, I’ve also added the template tags for the component’s footprints. This was something that was request by adzenith over at github. Hopefully you too will find this useful.
I’m very excited to update Kicad_Bom_wizard to 0.0.6 and get a perfect BOM of my project! It is almost the best bom plug-in of Kicad! I love this plug-in!
Hello Ronald,
That’s an awesome BOM plugin there! Exactly what I was looking for!
I had a query though. Could you please tell me if the plugin would work on multiple sheets in a KiCad project?
Once again, kudos to the awesome work!
Regards,
Vin
Yep it works on projects that have multiple sheets. That said, the plugin only uses the root sheet title data for displaying project info. Were you needing the other sheets titles data?
-Ron
Hi Ronald,
Please add my thanks for this well thought-out plug-in. It all worked perfectly out of the box, except for a format error in the CSV template. In the row.conf file you missed out the comma separators between the ROW_PART_VALUE, ROW_PART_FOOTPRINT and ROW_PART_FIELDS entries.
I’ve looked at other options for BOM generation in KiCad, and yours is by far the most flexible and easiest to customise.
Regards,
Tony
Thanks for your effort on this project. I am fairly new to KiCAD and this looks like a good way to produce the BOM. I have one question on the sort order.
As installed I get this for my diodes:
D1 D2 D3 D5 D7 D9 D13 D14 ,8,1N4002,?
D15 ,1,ZENER,?
D10 D4 D6 D8 ,4,1N4747A,?
Is there a way to get this:
D1 D2 D3 D5 D7 D9 D13 D14 ,8,1N4002,?
D4 D6 D8 D10 ,4,1N4747A,?
D15 ,1,ZENER,?
Ref sorted by number left to right and top to bottom in number order.
Thanks
Ron
Hi Ronald. I’m trying to run this on KiCad for Mac – have followed the instructions in the video and on this page, but when I select Generate, I get the following text in the “Plugin info:” window
Run command:
node “/Volumes/Nifty/Google Drive/Web Downloads/KiCad_BOM_Wizard.js” “/Volumes/Nifty/Google Drive/VS Musician Project/VS Musician Project.xml” “/Volumes/Nifty/Google Drive/VS Musician Project/VS Musician Project.html”
Command error. Return code -1
Error messages:
execvp(node, /Volumes/Nifty/Google Drive/Web Downloads/KiCad_BOM_Wizard.js, /Volumes/Nifty/Google Drive/VS Musician Project/VS Musician Project.xml, /Volumes/Nifty/Google Drive/VS Musician Project/VS Musician Project.html) failed with error 2!
Do you know what error 2 is?
Hi Paul, could you try specifying the full path to node. for example replacing node to /usr/local/bin/node.
For example,
replace node to /usr/local/bin/node.
/usr/local/bin/node /Volumes/Nifty/Google Drive/Web Downloads/KiCad_BOM_Wizard.js, /Volumes/Nifty/Google Drive/VS Musician Project/VS Musician Project.xml /Volumes/Nifty/Google Drive/VS Musician Project/VS Musician Project.html
Unfortunately, this is an issue with how KiCad excutes terminal programs. It doesn’t use the system paths. 🙁
Here the Forum where a member had the same issue. https://forum.kicad.info/t/kicad-bom-wizard-plugin-with-customisable-output-can-make-html-and-csv-bom/2142/7?u=opticalworm
Did you ever receive an answer to this question? I too am looking for a way to edit the output sorting by Ref.
@opticalworm Ron.., what part(s) of the KiCad_BOM_Wizard.js code determines the sort order? Is any sorting implied or does it output the BOM based on the order that it finds the parts (Ref) in the schematic file?
Good job on the Wizard!
Thanks,
-Alan
Hi Alan,
The plugin currently sorts by groups and the custom fields. As far as the order that components appears within the groups its left in the order that they appear on the XML file which in turn is KiCad default sort output.
I am currently working on adding some new features into the plugging including a means to a means to configure the BOM sorting. However, Right now I’m working on adding support for the plugin to read a config file. this I believe will make the plugin easier to use and hopefully easier for me to add new configurable features.
That said, The sorting part of the pluging is done on line 220 and 233 on KiCad_BOM_Wizard.js.
Here what the code looks like on those lines.
  fieldsList.sort()

  var TempFieldHeader = ''

  for (FieldIndex = 0; FieldIndex < fieldsList.length; FieldIndex++) {
    TempFieldHeader += HeadersTemplate.replace(//g, fieldsList[ FieldIndex ])

    TempFieldHeader = TempFieldHeader.replace(//g, '')

    TempFieldHeader = TempFieldHeader.replace(//g, '')

    TempFieldHeader = TempFieldHeader.replace(//g, '')

  }

  // now place it where it needs to be

  OutputHeader = OutputHeader.replace(//g, TempFieldHeader)

  groupedList.sort()
Hi Ronald.
Dang!! now I have error 13..But at least error 2 is gone! Sorry to keep pestering you!
Hi Ronald.
I found the problem: did a reinstall, changed permissions on a couple of folders – and installed xml2js. The last step solved the problem!
Hi Ronald, I’m getting the same error as you.
How did you solve it? Which forders’ permissions have you changed?
You need either to use nodejs command (note the “js”) or to install nodejs-legacy which provides node command (without “js”).
sudo apt-get install nodejs-legacy
or
nodejs “/home/david/KiCad_BOM_Wizard-master/KiCad_BOM_Wizard.js” “%I” “%O.html”
Now, everything works!
Very good BOM plugin. Works right of the box indeed. And easy to change to your own needs. Thanks!!!
Hi Ronald,
can you give an example how to change the order in output .csv file? I have inside the component properties some new field.
For example Description,Manufacturer,MNF and Supplier are fields from component properties:
Generate order from your Template -> To wish order
Qty,Value,Description,Manufacturer,MNF,Supplier -> MNF ,Manufacturer,Description,Value,Qty,Supplier
Thanks
Hi,
Unfortunately, the tempalte isn’t as flexible as you need it. For example, you won’t be able to order the customs fields. That said, you can control if the all the fields value appear before the standard fields or after.
For example,
MNF,Value,Qty or MNF,Qty,Value or Qty,Value, MNF
If that is Ok with you, then you just need too edit both /Template/CSV/row.conf and /Template/CSV/fields.conf files like this.
/Template/CSV/row.conf
<!--ROW_PART_FIELDS--><!--ROW_PART_VALUE-->,<!--ROW_PART_QTY-->,<!--ROW_PART_REF-->
/Template/CSV/row.conf
<!--ROW_PART_FIELDS--><!--ROW_PART_VALUE-->,<!--ROW_PART_QTY-->,<!--ROW_PART_REF-->
I hope that helps.
– Ron
Trying to get this working on a Windows 10 machine but failing to generate a BOM:
Run command:
node “C:/Users/paul/AppData/Roaming/npm/node_modules/kicad_bom_wizard/KiCad_BOM_Wizard.js” “D:/KiCad projects/first attempt.xml” “D:/KiCad projects/first attempt.html”
Command error. Return code -1
If I run the script from a command line outside KiCad, the system returns an error on line 1 character 1: It doesn’t like the # that’s there.
Don’t know anything about javascript so this may or may not mean anyting.
Any guidance is greatly appreciated.
Hi Paul, That’s strange I have it working on windows 10. what version of nodejs are you running.
You can get the version like this.
node --versionI’m currently on v6.10.0 on window.
– Ron